practical guide
How often should reformer springs, ropes and straps be replaced in a busy group studio?
Springs lose tension, ropes fray from the inside and footbar hardware loosens under group class volume. A concrete inspection rhythm and replacement window for every wear part.
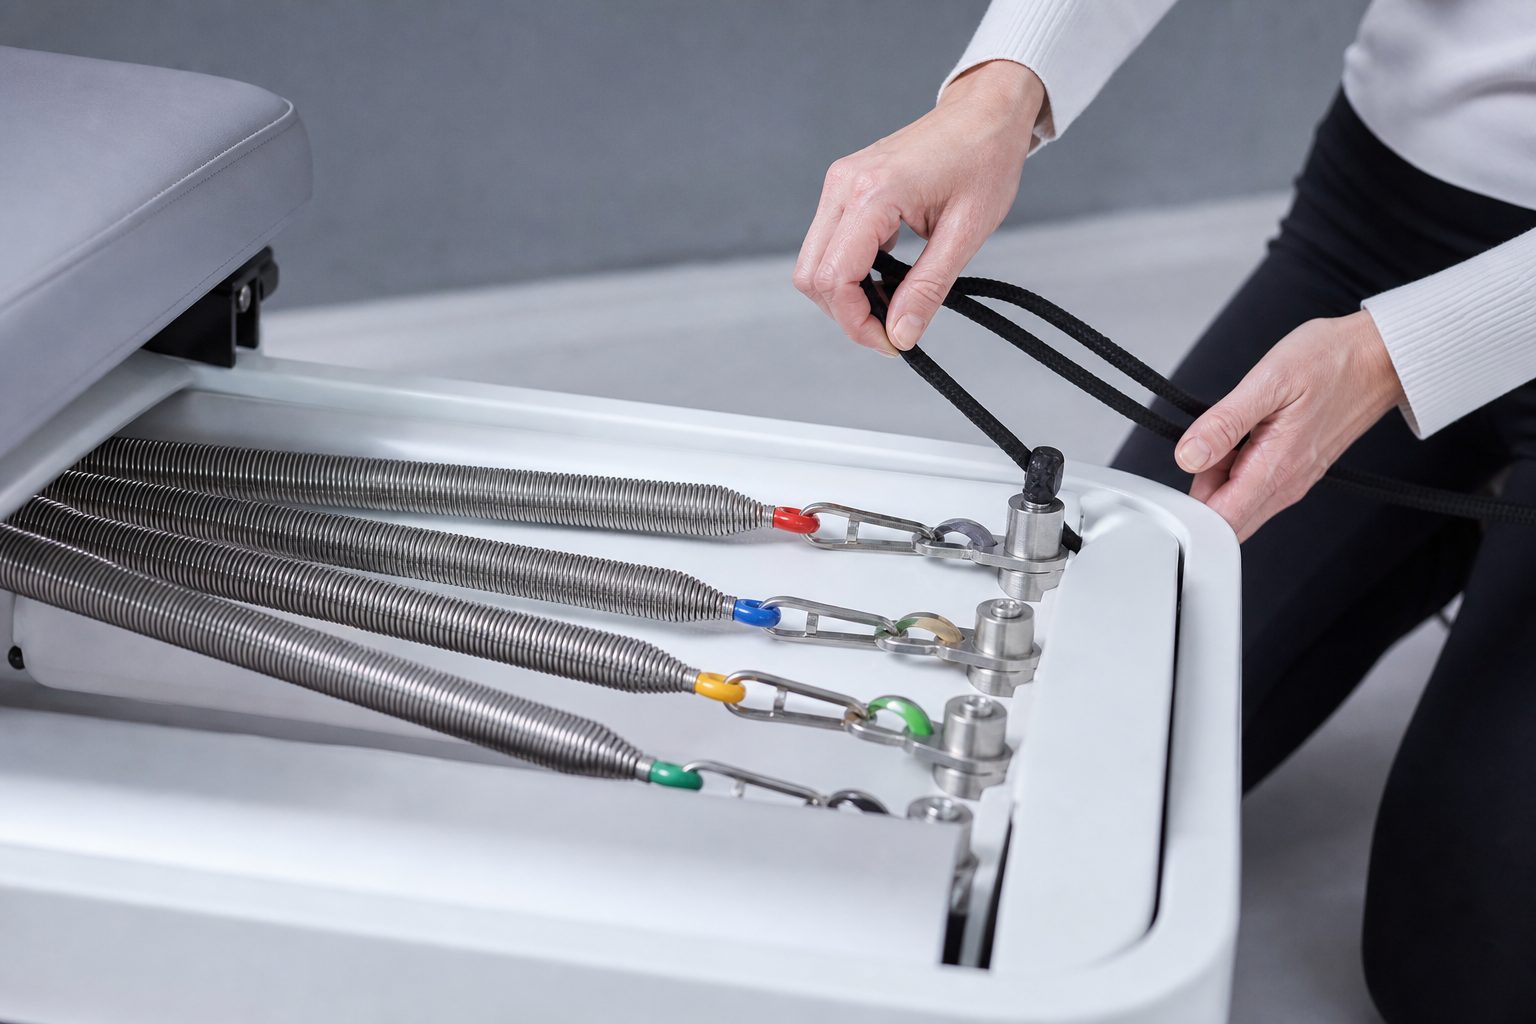
In a studio running 30 or more group classes a week, plan on replacing ropes every 12 to 18 months, straps and handles every 12 to 24 months, and springs every 3 to 5 years, with the two springs your teachers reach for most going sooner than the rest. Wheels get replaced when they stop rolling silently, which on heavy schedules tends to fall somewhere around the four year mark.
Those windows are starting points, not gospel. Volume is what actually drives wear, and volume varies wildly between a machine on the front row that gets used in every class and the corner machine that only fills on Saturdays. Inspection tells you the truth. The calendar just tells you when to look.
What follows is the inspection rhythm, the specific failure signs for each part, and the log format that keeps your insurer and your attorney satisfied if something ever goes wrong on the floor.
Wear parts on a reformer and what each one fails like
Every wear part on a reformer fails differently, and knowing the failure mode tells you what to look for.
- Springs. Fail slowly by losing tension, not suddenly. A tired spring stretches longer at rest and feels lighter than its color implies. Catastrophic snapping is rare; silent drift is normal and it changes what your clients are actually loading.
- Ropes. Fail from the inside. A braided rope abrades internally where it passes over the pulley, so the outside can look acceptable while the core is compromised. This is the part most likely to let go mid class.
- Straps and handles. Fail at the stitching and at the buckle or clip. Webbing frays at the edges; the loop that carries the load is where the tear starts.
- Clips and carabiners. Fail by gate wear. The gate stops closing fully, then stops closing at all.
- Wheels. Fail by bearing wear and flat spotting. The symptom is noise and a carriage that no longer glides evenly.
- Footbar hardware. Fails by loosening. Bolts back out under repeated load, and a footbar that shifts under a client's push is the injury waiting to happen.
- Upholstery. Fails by cracking at the seams and at the shoulder rest posts, usually accelerated by the cleaning product you chose.
Keep reading: Should I sell class packs, unlimited memberships or a hybrid when my equipment caps attendance?
Weekly visual check that takes four minutes per machine
Assign this to a named person and a fixed slot, because a check that belongs to everyone belongs to no one. Ten machines is 40 minutes, once a week.
- Ropes, 60 seconds. Run the rope through your fingers along its full length, especially the section that sits over the pulley at your studio's standard rope length. Feel for thin spots, lumps, stiffness and fuzzing. Look at the knot or the crimp at the anchor.
- Straps and clips, 30 seconds. Check stitching at every load bearing loop. Open and close each clip; the gate should snap shut cleanly.
- Springs, 45 seconds. Look at both end hooks for opening or deformation. Check that every spring hangs at a consistent resting length compared to its mates.
- Carriage travel, 45 seconds. Push the carriage through the full range, unloaded, with your ear near the rail. It should be silent and even. Grinding, ticking or a hesitation at one spot means wheels or debris.
- Footbar and gearbar, 45 seconds. Move the footbar through every position and lock it. Push against it hard with both hands. Any play means hardware needs tightening.
- Upholstery and shoulder rests, 30 seconds. Check seams, check that shoulder rests are secure and not spinning, check the headrest mechanism.
Anything that fails the check comes out of service that moment. Not after the 9am class. A machine with a towel over it and a sign is a small revenue loss; a rope failure during footwork is not.
Reading spring fatigue by resting length and feel
You cannot judge a spring by looking at it, but you can measure it. Do this once and you have a reference forever.
When you buy new springs, measure each one at rest, unhooked, from hook end to hook end, and write the number on a card taped inside your equipment cabinet. Record it by color and by manufacturer, because a red spring from one maker is not a red spring from another.
From then on, measure at each quarterly deep check. The rule of thumb most studios use: when a spring's resting length has grown by roughly 5 percent over its new measurement, it has lost meaningful tension and should be scheduled for replacement. On a spring that started at 20 inches, that is an inch of permanent stretch.
Three practical points.
- Replace springs as a set per machine, or at minimum in matched pairs. Mismatched tension across a machine is worse than uniformly tired springs, because a client loading two reds is no longer loading two equal reds.
- Never store a machine with springs loaded. Springs left stretched over a footbar or hooked at tension during a long closure will take a set.
- Rotate springs between the inner and outer hook positions if your machine allows it, so the ones your instructors default to are not always the same physical springs.
Keep reading: Why do my prime time classes fill while my ten in the morning slot stays half empty?
Rope stretch, rope replacement and re-tying to equal lengths
Ropes stretch. On a busy machine, the first few weeks after installation produce noticeable stretch, then it slows, then it continues gradually forever. Two consequences follow.
First, the ropes on one machine drift to different lengths, because the side your teachers demonstrate on gets more load. Uneven ropes mean a client is working asymmetrically without knowing it, which is exactly the thing you sell them the opposite of.
Fix it monthly with a measuring block. Set the carriage against the stopper, pull each rope taut, and measure from a fixed reference point on the frame to the clip. Write the target number on the card in your cabinet. Adjust both ropes on a machine to match, then check that machine against a neighbor.
Replace a rope, do not adjust it, when you find any of the following: a section that feels thinner or softer than the rest, visible core showing through the braid, stiffness or glazing where it runs over the pulley, or a knot that has worked loose more than once. Replace both ropes on a machine at the same time even if only one has failed, because they have the same age and the same hours.
Wheels, rails, gearbar and footbar hardware
The carriage should be silent. Noise is the diagnostic.
Start with the cheap cause. Wipe the rails with a dry or barely damp cloth, then check for hair, sand and grit in the wheel channels. A surprising share of noisy carriages are just dirty rails, and this is why wiping rails belongs in your nightly close, not your quarterly service.
If it is still noisy, check the wheels individually. Tip the carriage or look underneath and spin each wheel with a finger. A wheel that will not spin freely, wobbles on its axle, or has a visible flat spot needs replacing. Replace all wheels on a machine as a set so the carriage sits level.
For hardware, put a quarterly bolt check on the calendar. Work around the machine and check every threaded fastener: footbar mounts, gearbar posts, shoulder rest posts, riser or tower bolts, pulley mounts and frame joints. Snug is the goal, not maximum torque, which strips inserts. If the same bolt keeps working loose, that is a sign of a worn insert and a call to the manufacturer, not a reason to keep tightening it.
See how ReformerRoster handles this for pilates studios
Upholstery cleaning agents that shorten vinyl life
The single fastest way to destroy commercial upholstery is the wrong disinfectant used ten times a day.
Alcohol based sprays and bleach solutions strip the plasticizers out of vinyl. The surface dries, then it hardens, then it cracks along the seams and at the shoulder rest posts. Studios that switched to heavy alcohol wiping routinely find themselves quoting reupholstery far sooner than they expected.
Practical protocol:
- Check the manufacturer's cleaning guidance for your specific upholstery and follow it. It exists, and it is usually specific about which chemistries void the warranty.
- For routine between class wiping, a mild soap and water solution on a cloth handles the actual soil, which is sweat and body oil.
- Where a disinfectant is required, choose a quaternary ammonium product rated as vinyl safe, observe the contact time on the label, and wipe the residue afterward.
- Keep spray bottles off the machine itself. Spray the cloth, not the carriage, so liquid does not run into the wheel wells and rails.
Building a maintenance log your insurer will accept
If a client is ever injured on a machine, the question will be whether you maintained it and whether you can prove it. A log that lives in someone's phone notes is not proof.
Give every machine a permanent number, physically labeled, and keep one record per machine containing:
| Field | What goes in it |
|---|---|
| Machine ID and serial | Your number plus the manufacturer serial |
| Date and initials | Who performed the check, not just that it happened |
| Check type | Weekly visual, monthly rope measure, quarterly bolt and spring |
| Findings | Pass, or the specific defect found |
| Action | Out of service, part ordered, part fitted, returned to service |
| Parts | Part name, quantity, supplier, invoice number |
| Return to service | Date and who authorized it |
Keep the supplier invoices with the log. An invoice showing you bought ten ropes in March corroborates the log entry saying you fitted them, and that pairing is what makes a record credible rather than self serving. Keep records for at least as long as your state's statute of limitations for personal injury claims, and ask your carrier what they want to see.
Making the schedule respect a machine that is down
All of this only works if a machine taken out of service actually disappears from what you can sell. The common failure is a studio that pulls reformer six on Tuesday, then sells ten spots in Thursday's 6am because the booking system still thinks there are ten.
ReformerRoster sets capacity per apparatus, so marking a machine out of service reduces the bookable spots in every affected class immediately, and the waitlist fills the spot when the machine comes back. Number your machines this week, start the four minute check, and let the schedule reflect the equipment you actually have on the floor.
Read also

Should I sell class packs, unlimited memberships or a hybrid when my equipment caps attendance?
Unlimited pricing rewards heavy users who crowd out new clients on ten reformers. A side by side look at margin, cash flow, no show behavior and breakage across each model.

Why do my prime time classes fill while my ten in the morning slot stays half empty?
Off peak emptiness is usually a scheduling and level mix problem, not a marketing one. The common decisions that quietly strand mid morning reformer capacity, and what to change first.
What is the right cancellation and late arrival policy when a reformer sits empty for the hour?
An empty reformer is unrecoverable revenue, but a harsh fee costs you clients. A clause by clause checklist for a cancellation policy that is enforceable and actually enforced.